Adding Products on Pages in ShopSite

There are a few ways you can add products to your category pages in ShopSite.  You can go to the PRODUCT and add the pages the product is on, OR you can go to the PAGE and add products on the page.  If you are familiar with uploading products, you can do it through an upload.  The first two methods are below.

Adding pages to a PRODUCT

  1. Log in to ShopSite
  2. Click on Products
  3. Find your product (use the search for name or SKU), click on it
  4. Click on Edit Product Info
  5. Scroll down to Product Pages, click on the Select button
  6. Click on pages in the “Product is not in these Pages” section then click on Add, then OK. (TIP: click in the box, then start typing the beginning of the page name, it will jump you down to that page.  TIP2: Holding down the CTRL key will let you pick more than one page at a time.)
  7. Scroll down and click on Save.
  8. Publish when done.  TIP:  you do not have to publish after each one.  You can do a bunch then publish. Publishing shows you your changes.

Adding products to PAGES (TIP: use this method when adding lots of products to a page)

  1. Log in to ShopSite
  2. Click on Pages
  3. Find your page (use the search for name), click on it
  4. Click on Assign Items > Click on Product then proceed
  5. Pick products in the products not assigned section then click on Add, then save changes. (TIP: click in the box, then start typing the beginning of the product name, it will jump you down to that page.  TIP2: Holding down the CTRL key will let you pick more than one product at a time. TIP3: you can search for a certain word in the product and it will display only those.)
  6. Click on pages in the “Product is not in these Pages” section then click on Add, then OK.
  7. Publish when done.  TIP:  you do not have to publish after each one.  You can do a bunch then publish. Publishing shows you your changes.

SEO Toolbook: Free Tools for Dominating Google’s Free Listings

SEO Toolbook
SEO Toolbook

Recently reviewed a SEO (Search Engine Optimization) Toolbook by Jason McDonald.  This book contains info on how to use Google and Bing’s free … yes FREE tools to help you with SEO.  Granted you do need some knowledge of SEO.  But if you need that knowledge, you can get it with his online courses here:  http://www.jm-seo.org  and yes, some of his courses are also FREE.

In this toolbook, Jason explains how to pick your keywords, analyze your page tags, identify the links you want, writing press releases, website structure and more.  This is just what to do to your website.  Then he goes on to explain how to find out what you should do using Google and Bing tools as well as many other top SEO sites.

It isn’t true that “if you build it they will come”.  You need to keep up on the current SEO trends and why not do it using free tools.  You don’t have to use all the tools he recommends, just try a few and find out what ones you like that work best for you.  Start out slowly … changing just some of your site and see what works.  You will eventually want to use the information you will gain on all main pages of your site.    Chances are if you are not going to put time and effort into SEO, your lack of visits and sales will show it.

You can get this book for kindle here:  http://amzn.to/14vNXwR for $2.99.  No, I don’t get any commission for recommending it … I just think it is worthwhile.  :O)

Google Checkout Going Away

For those of you who use Google Checkout/Wallet as a payment option, looks like big changes are coming.  As of November 20th, this service will no longer be available.  Basically, Google Checkout/Wallet had acted as your payment gateway AND your merchant bank, very similar to how PayPal works.  Google has decided to quit doing this and say they will not offer a replacement product.

What does this mean to you?  If you offer Google Checkout/Wallet as a payment option in your ShopSite store, this will no longer work as of November 20th.  You MUST be sure you have another payment option available.  As I mentioned, PayPal basically works the same way so that would be a good option.  Also, if you usually pay your invoices from me via Google Checkout, you will need to use PayPal or send a check beginning in October 2013.

To read more about Google’s decision, you can directly to their site here:  https://support.google.com/checkout/sell/answer/3080449

Sharing Files

There is often a need to share files … easiest way is usually to just send an email. Many times, however, you may need to send multiple very large files. In these cases, you need a better solution … and a free one is the great!

Store Files in the Cloud - photo by fotosearch.com
Store Files in the Cloud

Google Drive.
If you have a google account, and most of us do, you can use Google Drive to share files. Just go to http://www.drive.google.com , login with your normal google login. Just need to share files? Click the upload button (the arrow pointing up on the left hand side), click Files, browse to the file to upload (hold down the ctrl key to pick multiple files), click on open. A new window will show up showing the upload is complete. If you want to share these files, immediately click on the share button next to your file. You will then get the link to share the file or, you can enter in email addresses of people you want to share it with. This email address should be in their Google account.

Want to use Google Drive to store important files? You can do that too. Download the software to your PC, follow the instructions and you can have files on your computer synched to your Google Drive account. This creates a backup if you will of your files and also lets you access them from other computers. For more help on Google Drive, visit the Google support center: http://support.google.com/drive/?hl=en .

DropBox.
DropBox.com offers a service where you can upload images to a cloud directory and then share that directory with others via email. Similar to Google Drive, an additional feature of DropBox is that you can download their software and actually have DropBox sync to a directory on your computer in essence creating a backup of your data. If you change a file locally, then DropBox will also get a copy. To, take the tour, you can start here: https://www.dropbox.com/tour . You can join with this link: http://db.tt/Fn8tRRPb .

Social Media Share Buttons vs Follow Buttons

Often I get asked to “put Facebook & Twitter  buttons” on a  clients website.  However, there are a couple different kinds and it is good to understand which one you might want to use.
social media
Share vs Follow
Share: The share buttons direct visitors to THEIR own account to post about you.  This can be done with facebook, twitter, pinterest, etc … most of the social sites have code to do this. How does this help you?  This gets your visitors to do some advertising for you! Their followers see that they like your site and then hopefully it drives traffic to your site. A great way to get the word out about your site.
Follow: Follow buttons are used if YOU have an account that you want visitors to go to.  So for example if you have a facebook, twitter, pinterest account that you want them to visit.  Keep in mind, this WILL take them away from your site. So you only want to do this if you feel it is valuable for them to visit your social site and not just your website.  You may have a small business website but a personal pinterest site so there would really be no need for a customer to “follow” your personal pinterest site.
It is best to have a mix of these two options on your site.  You should definitely have the Share buttons.  The follow buttons should only be included if they provide additional, important information about you, your products or services.
So what is the easiest way to add these buttons?  ww.addthis.com .  Addthis has done all the work for you, and it’s free to use.  Pick share or follow, pick the social media buttons you want to include and they will provide the code for you.  One downside, you cannot customize the look of the buttons if you are using Addthis.  If you want to have your own buttons that match your site, you will have to code them separately.  Most of the social networking sites have instructions on doing that.
Here are two Addthis links to help you get started:
Need help getting started, just let us know.
(photo from fotosearch.com)

Stock Photography – Find the Perfect Photo Fast!

Have you ever been in need of an image for brochure or website but thought you couldn’t afford a professional image?

Think again!  There are many online options that make professional images an extremely attractive option these days.  Think how much time it would take to set up your own photo shoot, not to mention the hassle of dealing with legal requirements like “model releases.”  Would you really be saving any money?

Fotosearch Stock Photography provides a portal where users can search through all the top photography publishers at one site.  Not only do you get a first-rate images at a reasonable price, but you also save a LOT of time.  And, how much is your time worth to you?

Users can find either royalty-free or rights protected images through the portal.  (Royalty-free images are cheaper;  rights protected images tend to be more exclusive.)  Image quality varies from low resolution, web images to high- and super-high resolution suitable for magazines or billboards.  Many images offer a variety of resolutions, so you can pick what is most appropriate – and cost
efficient – for your use.

In addition to photos you can find clipart, illustration and medical illustration, stock footage/video clips, and stock music.

Why waste your valuable time when you have professional-grade, top quality images at cost efficient prices, just a click away?


Featured Client – Nelle and Lizzy

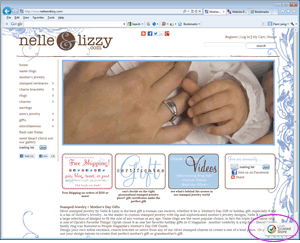
Nelle and Lizzy Home Page
Nelle and Lizzy

Nelle and Lizzy is now a member of Google Trusted Stores!  Took some time and a lot of work, but their trusted stores banner is now active!  Means buyers can get protection for their purchase and Google is proud to stand behind them.

Nelle and Lizzy sells personalized jewelry … you can customize and create your own pieces or choose from those already created for you.  They specialize in Mother’s gifts so are a great find for Mother’s Day!

Nelle and Lizzy Google Trusted Stores Badge
Now a member of Google Trusted Stores!

Let us know if you are interested in becoming a Google Trusted Store.  You can review the requirements HERE and we can help get you on your way!

Attaching Google Webmaster Tools and Google Analytics

A new feature of Google analytics is that you can now enable webmaster tools data within analytics. This data will then be available in your Search Engine Optimization reports in Analytics.

To set it up, you need to have both a webmasters tools account and an analytics account.  If you are one of our clients, just let us know you want them attached and we’ll do it for you.  To do it yourself,  click on Search Engine Optimization reports and follow the instructions.

Directly from google:

How to use Webmaster Tools data within Analytics

Webmaster Tools provides data about what users see in Google search results before they decide to click to your site (or some other site). You can use this data to identify opportunities and prioritize development effort to increase the number of visitors to your site. Examples:

  • Identify  landing pages on your site that have good clickthrough rates (CTR), but have poor average positions in search results. These could be pages that people want to see, but have trouble finding.
  • Identify search queries (keywords) for which your site has good average positions, but poor click through rates. These are queries for which your pages get attention and improved content could lead to more visitors.

For more information, please go here:  http://support.google.com/webmasters/bin/answer.py?hl=en&answer=1120006

ShopSite and Image Alt Tags

Want to get more traffic to your site … you need to make Google happy.  One thing you can do is to have what are called “alt” tags associated with your images.  If you are using ShopSite, these alt tags are not necessarily what you want them to be. Do a View > Source Code in your browser to see what is showing for  your product images.  You may be surprised at what is listed — might be file name which doesn’t mean much for a google search or might even be blank.

hosting at lexiconn
Hosting at Lexiconn

What can you do? Well, if you host with Lexiconn, they have developed a new utility just for this purpose, their Image Alt Tag Module.  If you have a ShopSite Pro account, they let you have this module for free and they will install it for you.  All you need to do is decide what you want your alt tag to be.  Pick from Product Name, Product Description, SKU, an extra product field so you can virtually use anything!  It updates daily so any changes you make show up in a timely manner without you having to do anything. Not sure what field to use for your alt tag? We can help you with that and can help you create a custom field if you want it something specific.

Be sure to use search words in your alt tag to help customers find you and keep Google happy!

Changing Multiple Products at once in ShopSite

Ever have the need to change or review something for all your products in an easy way?  With ShopSite you can do this.  What you want to do is to download your products, save the file, then open it in Microsoft Excel or similar spreadsheet program.

To download your products, go to ShopSite > Utilities
> ShopSite Database > Database Download > Products > Download.

Format: use the top radio button, most recent version

Download Fields:
to create a backup of all your products, use all.  To change or review something specific, click on the selected fields only button and select just the fields you want to see.  Always keep the SKU as it is a key field when you re-upload your changes.

Download Options: download data to your browser.

Download File Name:
give it a file name that makes sense. Save to your computer.

Open your file in spreadsheet program.  Make changes, then you can upload the same way.  Need help with the upload, let us know.  ALWAYS make a backup of your store before you upload just in case!